काकआसन
Kakasana: kaka काक = “crow”
Crow pose or Kakasana is the most straightforward arm balance that you can try to do practicing yoga. Doing it for the first time, you not only learn to hold the balance of your body. Crow Pose is about being strong and flexible and almost fearless.
The common thing is to mix Crow pose with the Crane pose. However, yoga schools take these as two separate positions that look the same but differ slightly. For example, the Crane pose (Bakasana) is performed with straight arms, while Crow pose (Kakasana) – with bent arms. All other elements of these two yoga shapes are the same. In fact, the Crane pose can be even more complicated because you’ll need stronger arms for it.
In today’s post, find some guidelines on how to perform the Crow pose, modify it, what dangers are there, and how to make this a safe journey to a handstand.
How to Get into It
1) There are also two ways to get into the Crow. Choose depending on your hips and ankle joints flexibility.
- Start in Malasana or garland pose. In this case, your legs are bent and pressed to the core, knees are wide apart, your back is flat. If available, keep your heels on the floor. Give yourself a few breaths to settle down and find the center inside you. After it, proceed to step#2.
- Start in a deep yogi squat. It looks pretty much like Malasana, but you’re on your toes with heels above the mat.
2) Put your hands in front of you on the mat (the distance from your feet is 50-60 sm). Palms are shoulder-width apart. At this stage, your shoulders are between your knees. Ensure your palms are appropriately pressed, and you’ve got a stable grip. Fingers are spread wide, thumbs on both hands create a 90° angle with index fingers.
3) Press both knees to the triceps (right in the middle of the shoulder bone), try to hold them closer to armpits.
4) Start to shift your upper body forward. Bend your arms, so they create a shelf for your knees. At the same time, raise your pelvis and get yourself on the toes tips. Gaze down, and don’t rush.
5) In the next stage, try lifting one leg’s toe off the floor and balance. Engage your core to hold the position solid. Use your hands as support. Remember to breathe deeply. Lift both toes off the mat and shift the whole body weight on your hands when you can. Watch your face and try not to fall flat on it!
Hold this for a few seconds and proceed to a minute hold as your strength and flexibility grow. To get out of the pose, use your lower body and land on the balls of your feet.
Benefits
- The Crow pose creates stronger arms and wrists. You may also require some stretching preps for your wrists to prepare them for the Crow pose.
- It stimulates you to open your hips more. For people with tight hips, it’s a good idea to include extra hip opening postures in their practice. Without flexibility in the hips’ joints, you’ll fail to get the correct position of the legs for this arm balancing asana.
- It tones the core and back muscles that help to keep your spine in the proper position during the asana.
- Crow pose is a super cool motivational tool. Once you’re in it, you will be surprised by what your body actually can do. But, of course, fear of falling is something that you’ll have to go through too with this posture.
Precautions
A few health conditions restrict you from this Crow pose practice: carpal tunnel syndrome, wrist or shoulder surgery or injury, and cerebral thrombosis.
In other cases, first, arrange a check-up with your therapist to see if it’s ok to incorporate this pose into your yoga routine.
To prevent face injury (if you fall off the asana), place a crash padding in front of your face made of any soft towels or blankets.
Avoid jumping into this balance. Instead, go slowly, step by step, maintaining the body’s awareness at each stage.
5 Crow Pose Variations to Make It Really Work
Modifications
Beginners: To lift the floor for you, use a block under your feet. In this way, you require less strength in the core and not so deep squat. So you’ll be able to play a bit with the lifts before you find the “lifting center.”
Another weak zone is the elbows and shoulders. If they aren’t strong enough, they tend to splay out. To avoid this, loop a strap around your both hands just above the elbows’ joints.
Advanced: Jumping out of Crow pose to Chaturanga is something you may want to try when you already have got enough balancing skills. Find a quick tutorial for this below:
<iframe width=”560″ height=”315″ src=”https://www.youtube.com/embed/vMUgT_D9QWg” title=”YouTube video player” frameborder=”0″ allow=”accelerometer; autoplay; clipboard-write; encrypted-media; gyroscope; picture-in-picture” allowfullscreen></iframe>
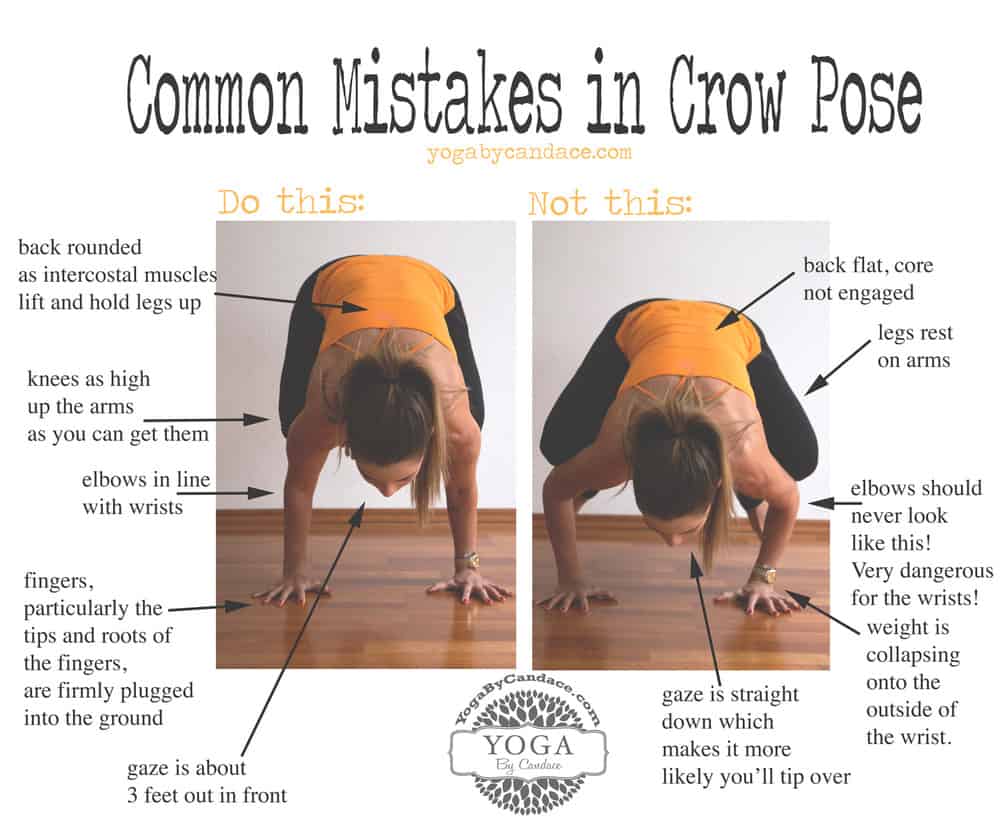
Common Mistakes
Below we have included misalignments that are very common for Crow pose: