Not only do newbies in yoga hate doing Warrior poses. It often makes you feel like you cannot stand on one leg, which visually looks pretty easy to achieve. In addition, constant fall-offs reduce your motivation to zero and make you think about quitting yoga practice.
But the truth is when you know the simple biomechanics of the movement, you won’t fall of the Warrior 3.
Seriously, I mean it! Your body is the primary tool to achieve balance in the Warrior 3 pose. So the only thing to find out is how to use your body better to get to your perfect balance. So read and try the below cues to get a fun experience of hovering in the Warrior 3 pose.
How Do I Know Why I Fall Off the Warrior 3?
Warrior 3 is a challenging position that involves the teamwork of leg and back muscles. To fix your balance, you should know what causes the trouble.
The simplest way is to ask our yoga teacher for advice. Visual examination of the pose helps to understand weak points and correct their alignment.
If you practice at home on your own, make a photo or video of you doing the Warrior 3 pose. Observe how you align all the main areas and determine what point makes you fall or sway.
Main points to check:
- Soles’, feet ankles’, thighs’ and knees’ position
- Pelvis alignment
- Shoulders and arms
- Ribcage and torso position
- Neck and gaze
Now let’s see how to place the above structure better to create a balancing perfect form of your Warrior 3.
So, How Do You Get the Perfect Warrior 3 Pose?
In all standing positions, feet are the critical point. For proper grounding, your soles shouldn’t be tensed like this:
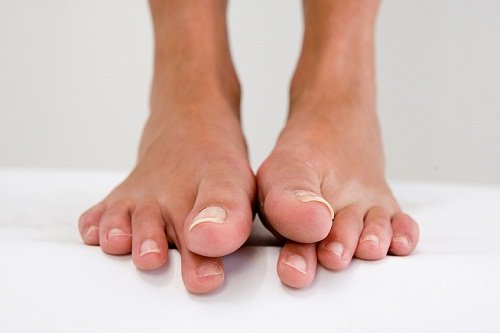
Even if other points are adequately aligned, you’ll fail to get the proper grip with such fingers’ position.
Tip #1 Use Drills for Your Soles Beforehand
Invest time and extra effort to relax and strengthen your soles, toes, ankles. Use massaging balls and rollers for soles’ relaxation.
Include these simple drills into your practice to prepare your feet for Warrior 3 balancing pose:
Remember! all four corners of your feet should be pressed to the mat. Avoid shifting the body weight to the balls of the foot or heels.
Mountain Pose or Samasthiti (Tadasana)
Tip #2 Square Your Hips and Shoulders to Make Them Really Parallel to the Floor
After you lift one of your legs, it’s expected that the corresponding hip wants to open up towards the ceiling. Avoid that move right as you notice it. Instead, gently rotate your pelvis and make both hip bones look down.
If that’s hard, grab a pair of yoga blocks and put your palms on them. Then, try lifting the leg with hands on the blocks, and you’ll understand how easier this can be achieved with the help of props.
Tip # 3 Do Use Your Torso as a Lever
In the Warrior, your torso and lifted legs are both levers. Use them to get the flying effect of the pose.
To understand how that works, play with your ribcage and pelvis. For example, when you stand on both legs, feel where is your ribcage now? Do you stick it forward? Or behind you? Try both moves to really get that sensation that you rule the position of your own ribcage. Got it? Ok, pay attention to the fact that the proper position when you stand on both legs – is ribcage right above the pelvis.
After you master this lever balancing, you can use ribcage to balance in Warrior 3. How? Simply coordinate the position of the torso and lifted leg. Ensure that you lift the leg and fold to the front with the same pace and strength. Next, keep your torso and leg parallel to the floor by engaging leg and back muscles simultaneously.
Tip #4 Use Your Gaze to Align the Neck-Heel Line
Drishti or gaze is another tool you have when you practice yoga balances. In yoga, we believe where your gaze is where your attention goes. So, make sure your gaze slowly shifts from front to the down floor. For example, when you’re in the Warrior 3, look straight in front of you and don’t look up to prevent neck strains.
Cue: imagine one line that goes through your body, uniting the crown of your head, spine, and through your leg to the heel of the lifted leg.
Tip#5 Don’t Hold the Breath
With all that alignment details, it’s easy to forget to breathe. So, yes, remember to breathe in and out.
Let your breath guide you through the asana.
Exhale when you start to lower the torso and start lifting the leg. Inhale when you feel stability and power in your legs. And play around a bit with your muscles and breathing to understand that you can control both.
With all that being said – good luck with your Warrior 3! And be ready for a new experience as soon as you start using these tips.
And One More, before You Go Which Warrior Pose Is Best for Balance?
If this is still the question for you, I’d say that all Warrior poses are good to learn your body to balance.
If you are a total newbie in yoga, pick Warrior 1 and add Tree pose to your daily practice. Train your soles muscles to get a better grip.
Intermediate yogis use Warrior 2 to get more challenges and work with pelvis opening.
The advanced practitioner chooses Warrior 3. So it’s better to go all the way by gradually increasing your skills.
Have a lovely Warrior 3 yoga practice today! Namaste!